Compliance - SNP
This section of the online help provides information on how to navigate to and use the features associated with administering and managing School Nutrition Programs reviews, as well as Corrective Action Documents (CADs). Through the web-based SNP Compliance administration sub-module, authorized users can:
· Schedule and track reviews.
· Enter and maintain Contracting Entity contact information related to the review.
· Identify sites to be included in the review.
· Manage the requirement for and submission of CADs.
· Enter notes for Contracting Entities to view.
· Enter internal only notes that are viewable only by State users.
Compliance Menu
From within the SNP module, authorized users would access the Compliance administration sub-module.
To access the School Nutrition Program Compliance Menu
1. Log on to the TX-UNPS web site.
On the Programs screen, select School Nutrition Programs.
Note: If a user only has access to the School Nutrition Programs module, the Programs screen is not displayed
The School Nutrition Programs home page displays.
On the blue menu bar, select Compliance. The Compliance menu screen displays.
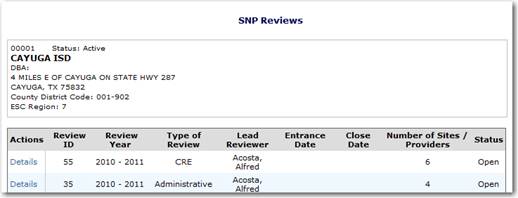
Under the Compliance module, the Review Tracking menu item provides access to all SNP-related reviews maintained within TX-UNPS for the selected Contracting Entity. Selecting the Review Tracking menu item will display the selected Contracting Entities list of SNP Reviews. If you have not already selected a Contracting Entity, upon selecting the Review Tracking menu item the system will take you to the Search screen to select a Contracting Entity.
From this screen you can either add a new review or open an existing review to view or modify. In either case, the user is transferred to the Review Dashboard for a summary of the review and a launching point to additional administrative and CAD review information.
Review Dashboard
The Review Dashboard serves as a launching point for all review administration information maintained on the web. It is used to schedule a new review, modify existing information, and maintain Corrective Action Documents (CADs) due and submitted by the Contracting Entity.
To access the Review Dashboard
1. If a Contracting Entity has not already been selected, search for and select a Contracting Entity using the TX-UNPS Search screen.
2. On the blue menu bar, select Compliance. The Compliance menu screen displays.
3. Select Review Tracking from the Compliance menu. The SNP Reviews list screen displays.
Select the Details link for the desired review. The Contracting Entity’s Review Dashboard screen is displayed.
To add a new review
The following steps detail how to add a new review for the selected Contracting Entity.
1. Search for and select a sponsor, if applicable.
Select Review Tracking from the Compliance menu.
Select Add New Review.
Complete the SNP Reviews – Tracking screen. Note: the following fields are required to schedule a review:
o Review Form Set
o Review Type
o Lead Reviewer (if unknown, select manager’s name)
Select Save.
Note: A new review must be scheduled within the Compliance administrative web software before it should be downloaded to a laptop. Once a new review has been added and saved, the system will display additional forms on the Review Dashboard.
Note: When a new review is saved, the system will automatically assign it a Review ID. This is a unique identifier for the review that can be used to cross-reference follow-up reviews with original reviews on the Review Tracking screen.
To view review download/upload history
On the Review Dashboard, the bottom of the screen displays Last Downloaded and Last Uploaded date. These dates correspond to the dates the review was last downloaded to or uploaded from the laptop.
1. Search for and select a Contracting Entity, if necessary.
2. Select Review Tracking from the Compliance menu.
3. Select the Details link for the desired review. The Review Dashboard displays.
Select the Download | Upload History link.
If applicable, the screen dynamically displays the type of activity, the User Name, and Date.
To view, add or modify administrative forms
Once a review is added to the system, several screens become available to authorized users. This includes the following:
· Contracting Entity Information (i.e., contact information)
· Sites (SFSP and CACFP only)
· Serious Deficiencies (SFSP and CACFP only)
· Commendations
· Notes to Contracting Entity
· State Agency Notes – Internal Use Only
The following steps detail how to access these screens for a selected Contracting Entity.
1. Search for and select a Contracting Entity, if necessary.
2. Select Review Tracking from the Compliance menu.
Select the Details link for the desired review. The Review Dashboard displays.
Select the View or Modify link for the form you wish to view, add data, or modify data.
Complete the screen.
Select Save.
Review Information
The Review Tracking screen contains general administrative information about the review. It is the first screen completed to schedule a review and the last screen completed to close a review.
To view or modify Review Information
1. Search for and select a Contracting Entity, if necessary.
2. Select Review Tracking from the Compliance menu.
Select the Details link for the desired review. The Review Dashboard displays.
Select the View or Modify link next to Review Information.
Complete the screen.
Select Save.
Note: The following three fields are required to setup a review. Other fields may be completed during/after the review: Review Form Set, Review Type, and Lead Reviewer.
Note: A review’s status must be set to “Closed” in order for the system to automatically flag the Contracting Entity for their next scheduled review. For SNP, this is every five (5) years; for SFSP/CACFP, this is every three (3) years.
Contracting Entity Information
The Contracting Entity Information screen contains general contact information.
To view or modify Contracting Entity Information
1. Search for and select a Contracting Entity, if necessary.
2. Select Review Tracking from the Compliance menu.
Select the Details link for the desired review. The Review Dashboard displays.
Select the View or Modify link next to Contracting Entity Information.
Complete the screen.
Select Save.
Note: Information in the Agency Representative and Contact fields default from the Contracting Entity application when the review is initially created. The user can change the information on this screen and it will not impact the Contracting Entity’s application.
Agency Representative: For SNP, this is the Superintendent/Sponsoring Official.
Contact: For SNP, this is the Child Nutrition Director.
Commendations
The Commendations screen provides the ability for the state to enter commendations. In TDA, commendations will be entered on the laptop software.
To view or modify Commendations
1. Search for and select a Contracting Entity, if necessary.
2. Select Review Tracking from the Compliance menu.
3. Select the Details link for the desired review. The Review Dashboard displays.
4. Select the View or Modify link next to Commendations.
5. Select the commendation to view or modify. Commendations Detail screen displays.
6. Complete the screen.
7. Select Save.
To add a Commendation
1. Search for and select a Contracting Entity, if necessary.
2. Select Review Tracking from the Compliance menu.
3. Select the Details link for the desired review. The Review Dashboard displays.
4. Select the Modify link for Commendation.
5. Select Add New Commendation.
6. Enter the commendation in the textbox.
7. Select Save.
Notes to Contracting Entity
The Notes to Contracting Entity screen provides the ability for the state to enter notes that can be viewed by the Contracting Entity.
To view or modify Notes to Contracting Entity
1. Search for and select a Contracting Entity, if necessary.
2. Select Review Tracking from the Compliance menu.
3. Select the Details link for the desired review. The Review Dashboard displays.
4. Select the View or Modify link next to Notes to Contracting Entity.
5. Select the note to view or modify. The Notes to Contracting Entity Detail screen displays.
6. Complete the screen.
7. Select Save.
To add a new note
1. Search for and select a Contracting Entity, if necessary.
2. Select Review Tracking from the Compliance menu.
3. Select the Details link for the desired review. The Review Dashboard displays.
4. Select the Modify link for Notes to Contracting Entity.
5. Select Create New Note.
6. Enter the Subject in the textbox.
7. Enter the Note text in the textbox.
8. Select Save.
State Agency Notes
The Internal State Agency Notes screen(s) provide the ability for the state to enter internal only notes that are not viewable by the Contracting Entity.
To view or modify State Agency Notes
1. Search for and select a Contracting Entity, if necessary.
2. Select Review Tracking from the Compliance menu.
3. Select the Details link for the desired review. The Review Dashboard displays.
4. Select the View or Modify link next to State Agency Notes – Internal Use Only.
5. Select the note to view or modify. The Notes to Contracting Entity Detail screen displays.
6. Complete the screen.
7. Select Save.
To add a new note
1. Search for and select a Contracting Entity, if necessary.
2. Select Review Tracking from the Compliance menu.
3. Select the Details link for the desired review. The Review Dashboard displays.
4. Select the Modify link for Notes to Contracting Entity.
5. Select Create New Note.
6. Enter the Subject in the textbox .
7. Enter the Note text in the textbox.
8. Select Save.
Note: Access to the Internal State Agency Notes screen is controlled by security. Please see the TX-UNPS Help Desk if you think you should have access to this screen.
Adding Sites
As part of scheduling a review, the state can identify which sites would be included in the various meal type reviews OR the Reviewer can select the sites from the laptop. At the bottom of the Review Dashboard, each SNP meal type and the sites associated with each meal type review are displayed, along with the ability to add a site.
Note: The list of meal types is automatically determined by the system based on the meal types selected on the Review Tracking screen.
To add a Site to the review
1. Search for and select a Contracting Entity, if necessary.
2. Select Review Tracking from the Compliance menu.
Select the Details link for the desired review. The Review Dashboard displays.
Select the Add Site link under the meal type for which the review will occur. The Add Site screen displays.
Check the box next to the sites to include for this meal type review.
Select Save.
Corrective Action Documents
The Corrective Action Documents (CAD) section displays at the top of the Review Dashboard and provides an at-a-glance view of the total number of CADs (i.e., findings) associated with the selected Contracting Entity’s review, as well as a count of CADs by status. The system will count all findings uploaded via the laptop, as well as those that may have been added via the Compliance administrative web screen. Within the Corrective Action Document screens, authorized users can add new findings, view or modify existing findings, and update Corrective Action Plan due dates within this section.
To view or modify Corrective Action Documents/Findings
1. Search for and select a Contracting Entity, if necessary.
2. Select Review Tracking from the Compliance menu.
Select the Details link for the desired review. The Review Dashboard displays.
Select the View or Modify link under the Corrective Action Documents section of the screen. The Findings screen displays.
Select the finding to view or modify. The Findings Detail screen displays.
Complete the screen.
Select Save.
Note: In most instances, findings are identified during the review and uploaded into the TX-UNPS database. Uploaded findings will have a status of Not Started. All uploaded findings are viewable from the Findings screen.
Note: Once findings are uploaded, the State would go into each finding and complete the “Required Corrective Action” and “Corrective Action Required” fields. At this time they can also enter Special Instructions and Due Dates.
Findings Details Screen Buttons
The table below identifies the buttons available on the Findings Details screen and what user type may have access to these functions. Individual security rights vary among users, so the table is for informational purposes only.
Button |
Available to State Users? |
Available to Agency Users? |
Save |
Yes |
Yes |
Submit For Acceptance |
Yes |
Yes |
Accept CAD |
Yes |
|
Cancel |
Yes |
Yes |
CAD Not Approved (displays after CAD has been submitted) |
Yes |
|
ReOpen (displays after CAD has been submitted) |
Yes |
|
Corrective Action Documents Status Codes
The system automatically sets statuses based on actions performed by the user. The table below identifies the various status codes associated with a CAD and under what conditions the status is set.
Status |
How Status is Set |
Not Started |
Finding is identified; no updates to the finding by the Contracting Entity or the State has occurred |
Pending Action |
Finding, Finding Description, and Required Corrective Action fields are completed; the Corrective Action Required field in the Finding Tracking section is set to “Action Required” |
Pending Submission |
Agency Corrective Action Response field is completed by the Contracting Entity |
Pending Approval |
Contracting Entity has submitted their CAD for state review (i.e., Contracting Entity clicks the Submit for Acceptance button) |
Denied |
Authorized state user has clicked the CAD not Approved button |
Closed |
Authorized state user has clicked the Accept CAD button |
Note: If the state decided to re-open a CAD, the status of the CAD returns to Not Started.
Note: If the state has identified a finding during the review, but decides NOT to require a CAD submission by the Contracting Entity, the state can set the Corrective Action Required field to “No Action Required” and the status will be set to Closed.
To add a new finding
1. Search for and select a Contracting Entity, if necessary.
2. Select Review Tracking from the Compliance menu.
Select the Details link for the desired review. The Review Dashboard displays.
Select the View or Modify link for Corrective Action Documents.
Select Add New Finding.
Select Finding from drop-down list (required).
Enter Finding Description in the textbox (required).
Enter Required Corrective Action in the textbox (required).
Enter any Special Instructions in the textbox. (This field can only be viewed and modified by State Agency Users)
Complete the Finding Tracking section. The Corrective Action Required field is required to be completed.
Select Save.
Note: The Agency Correction Action Response field is available to Contracting Entities only. This is the field the Contracting Entity would enter their response (i.e., corrective action) to the finding.
To add a new site finding
1. Search for and select a Contracting Entity, if necessary.
2. Select Review Tracking from the Compliance menu.
Select the Details link for the desired review. The Review Dashboard displays.
Select the View or Modify link for Corrective Action Documents.
Select Add New Site Finding.
For SNP, select the Site from the dropdown list (required).
For SNP, select the Meal from the dropdown list (required).
Select Finding from drop-down list (required).
Enter Finding Description in the textbox (required).
Enter Required Corrective Action in the textbox (required).
Enter any Special Instructions in the textbox. (This field can only be viewed and modified by State Agency Users)
Complete the Finding Tracking section. The Corrective Action Required field is required to be completed.
Select Save.
Note: For SNP, the Meal dropdown list is populated based on the Site selected.
Note: The Add New Site Finding option is enabled only when sites are associated with the review.
To submit a CAD for acceptance
For each finding, the Contracting Entity must indicate the necessary corrective action response in the “Agency Corrective Action Response” field and submit the corrective action plan for acceptance before the assigned due date.
1. Select Review Tracking from the Compliance menu.
2. Select the Details link for the desired review. The Review Dashboard displays.
Select the Modify link for Corrective Action Documents.
Select the Modify link for the desired Finding.
Enter the Agency Corrective Action Response in the textbox.
Select Submit for Acceptance.
Note: The Agency Correction Action Response field is available to Contracting Entities only.
To accept a CAD
If the Contracting Entity has submitted an acceptable corrective action response, the State can accept the corrective action.
1. Search for and select a Contracting Entity, if necessary.
2. Select Review Tracking from the Compliance menu.
3. Select the Details link for the desired review. The Review Dashboard displays.
Select the Modify link for Corrective Action Documents.
Select the Modify link for the desired Finding.
Enter the Reviewer Response to CAD in the textbox.
Select Accept CAD.
Note: Selecting the Show/Hide History link dynamically displays/hides any history pertaining to the finding. This link is available to state users only. Agency entries will be retained in history only when the Contracting Entity selects Submit for Acceptance.
To update all Corrective Action Plan Due Dates
1. Search for and select a Contracting Entity, if necessary.
2. Select Review Tracking from the Compliance menu.
3. Select
the Details link for the desired review.
The Review Dashboard displays.
Select the Modify link for Corrective Action Documents.
Enter the new desired due date in the textbox.
Select Update.
Note: The system allows authorized users to enter a CAD due date and apply the due date to all open and denied CADs. This is a time-saver by eliminating the need for the State to enter dates on each individual CAD as they are developed or to have to open each CAD once a due date is determined.